Skip to the main content.
Get Started

Website Design Strategy Workshop

STRATEGY

Website Design Strategy Workshop


Learn More

Website Development

IMPLEMENTATION

Website Development


Learn More

Website Growth Optimisation

ONGOING SUPPORT

Website Growth Optimisation


Learn More

5 min read

Effortless Website Revamp: Discover HubSpot's Content Staging

Effortless Website Revamp: Discover HubSpot's Content Staging
7:13

If you need a website makeover without the risk of messing up your current live website, HubSpot has the perfect solution for you: Content Staging.


What is Content Staging


Content Staging
is a HubSpot feature that lets you update and test website or landing pages in a separate staging environment before publishing them to your live site.

Your staged pages are hosted on a sandbox domain (your-domain.sandbox.hs-sites.com), not your live site. When you're ready, you can publish and replace multiple live pages all at once.

Here are some major benefits of using Content Staging:

  • It mitigates the risk of accidentally going live on Google
  • It prevents accidental publication by other team members
  • It preserves the continuity of your current website and ongoing work
  • Once you publish live, HubSpot automatically handles all URL updates and redirects


View Content Staging Dashboard in HubSpot

  1. Go to Content > Website Pages
    Go to Content > Website Pages

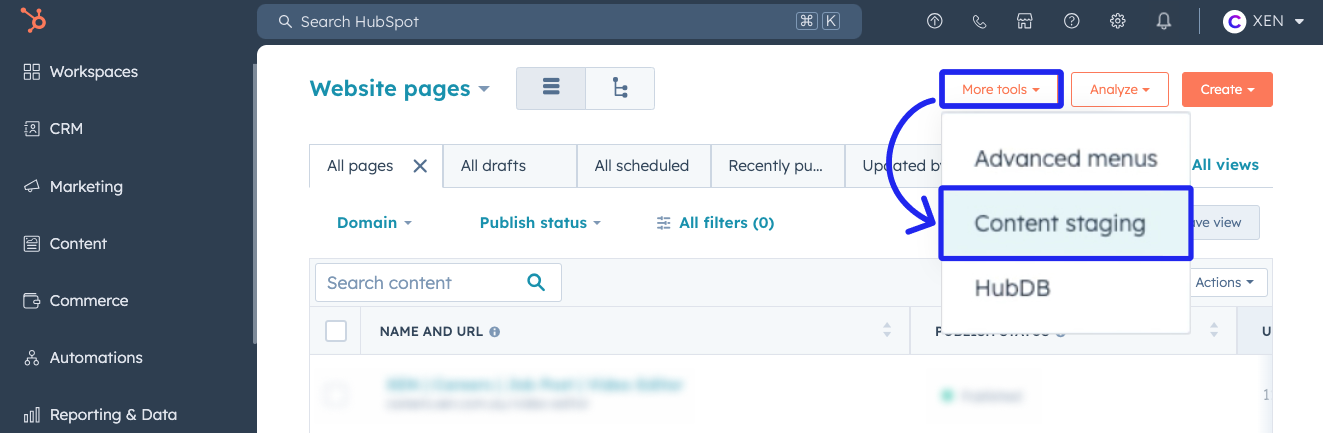
  2. Click the More tools button on the top right side > Content staging
    Click the More tools button on the top right side > Content staging

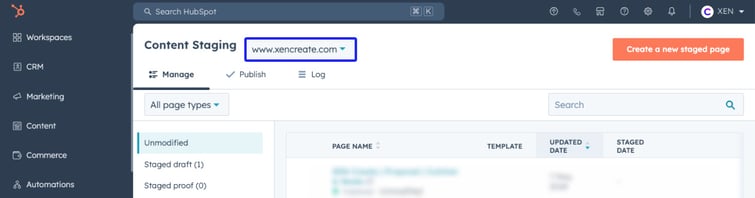
  3. If you want to create a staged page, make sure you choose the appropriate domain from the dropdown beside "Content Staging" If you want to create a staged page, make sure you choose the appropriate domain from the dropdown beside "Content Staging"

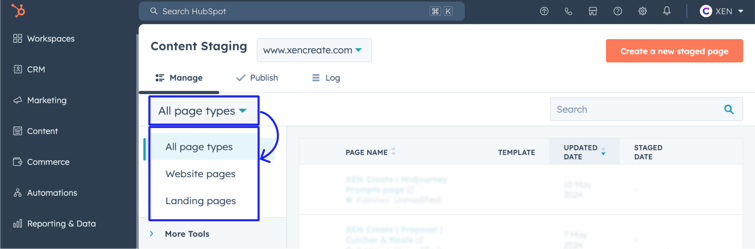
  4. You have an additional option to filter the type of pages you want to view: website pages, landing pages, or all types of pages.You have an additional option to filter the type of pages you want to view: website pages, landing pages, or all types of pages.

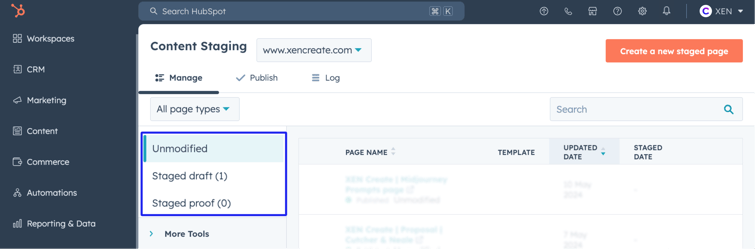
  5. In the content staging dashboard, there are three types of stages:In the content staging dashboard, there are three types of stages:
    • Unmodified: Published pages you can choose to modify.
    • Stage Draft: Pages you’ve created inside content staging but not yet published in the staging domain.
    • Stage Proof: Pages that have been published to the staging domain for review, but are not yet live. Once you're happy with the changes, these pages can be published to replace the live pages.


Four ways to create a page in Content Staging

  1. Create a new staged page
  2. Stage a blank page to replace an existing page
  3. Stage a cloned page
  4. Stage a detached clone page

I.  Create a new staged page
You can use this option to create a new page from scratch in content staging

  1. Click the "Create a New Staged Page" button on the upper-right corner of the dashboard.
    Click the "Create a New Staged Page" button on the upper-right corner of the dashboard.

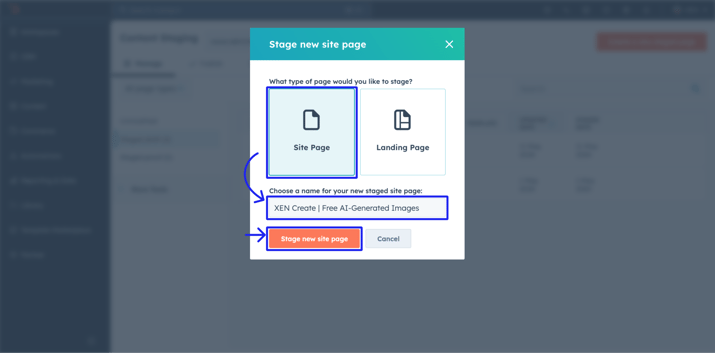
  2. Choose whether you want to stage a new Site page or Landing page and provide a name for your staged page. Then, click "Stage new site page."
    Choose whether you want to stage a new Site page or Landing page and provide a name for your staged page. Then, click "Stage new site page."

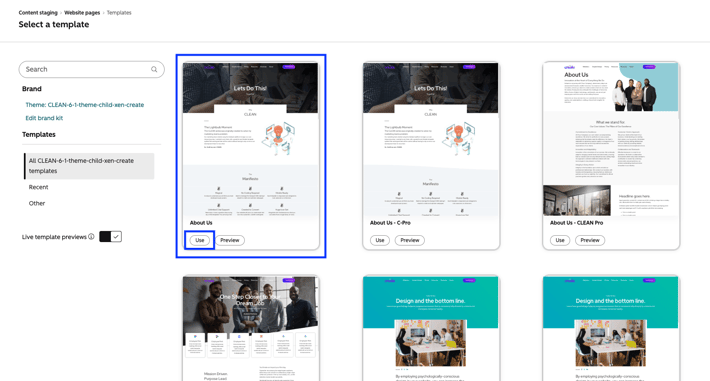
  3. Select a template for your new page, then click "Use".
    Select a template for your new page, then click "Use".

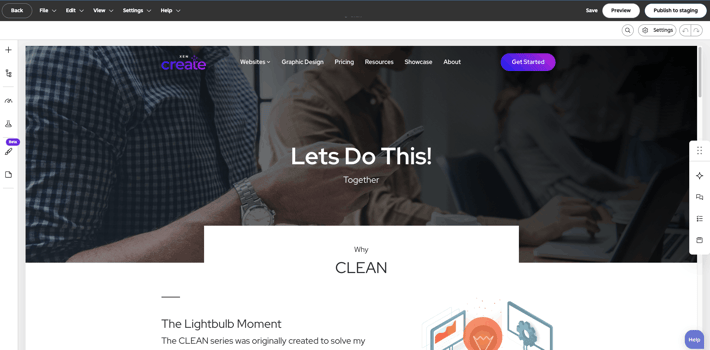
  4. This will open a page based on the template you selected, allowing you to edit your content in the page editor.This will open a page based on the template you selected, allowing you to edit your content in the page editor.

  5. After making your edits, click “Publish to staging.” This action will move your page from the staged draft to staged publish.After making your edits, click “Publish to staging.” This action will move your page from the staged draft to staged publish.


II.  Stage a blank page to replace an existing page

If you want to create a completely new page to replace an existing URL on your site. The page you design in content staging will ultimately replace the original live page you're staging. 

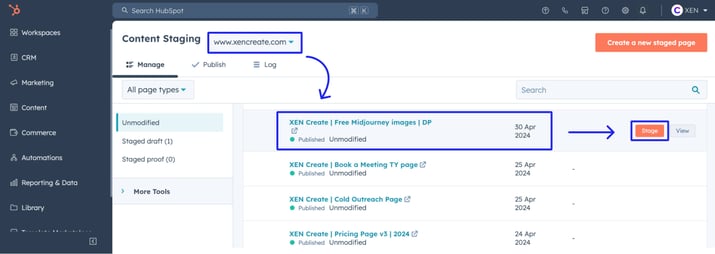
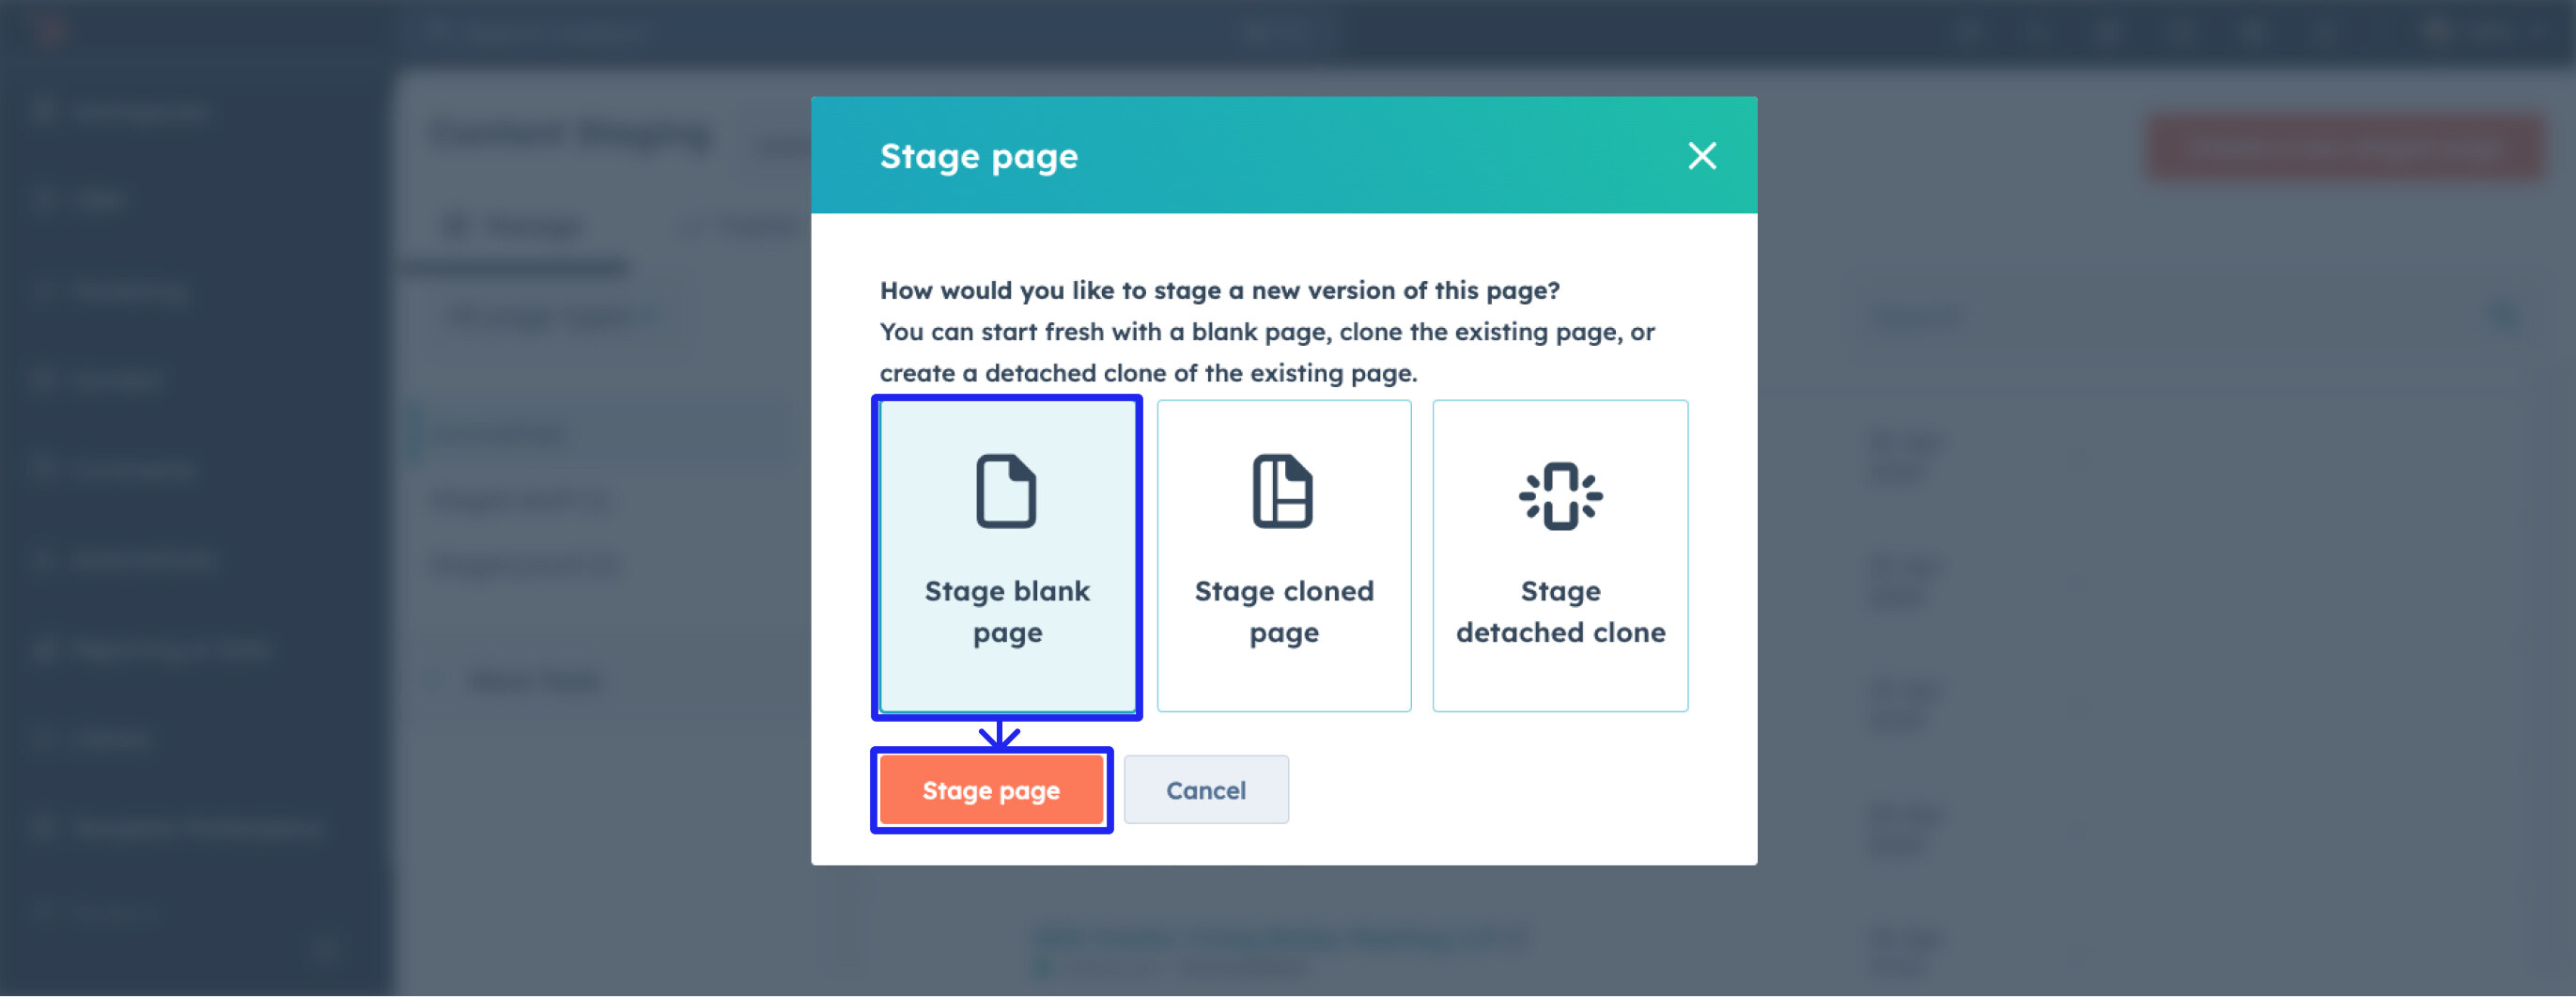
  1. In the Unmodified” category, hover over the page you wish to replace, then select "Stage" located on the right side.In the “Unmodified” category, hover over the page you wish to replace, then select "Stage" located on the right side.

  2. In the Stage Page dialog box, opt for "Stage Blank Page" and click “Stage Page”.
    In the Stage Page dialog box, opt for "Stage Blank Page" and click “Stage Page”.

  3. Select a template for your new page, then click "Use".
    Select a template for your new page, then click "Use".

  4. This will open a page based on the template you selected, allowing you to edit your content in the page editor.
    This will open a page based on the template you selected, allowing you to edit your content in the page editor.

  5. After making your edits, click “Publish to staging.” This action will move your page from the staged draft to staged publish.
    After making your edits, click “Publish to staging.” This action will move your page from the staged draft to staged publish.

III.   Stage a clone of an existing page

Use this option if you want to update your existing page while keeping some of the existing content:

  1. In the “Unmodified” category, hover over the page you wish to replace, then select "Stage" on the right side.
    In the “Unmodified” category, hover over the page you wish to replace, then select "Stage" on the right side.

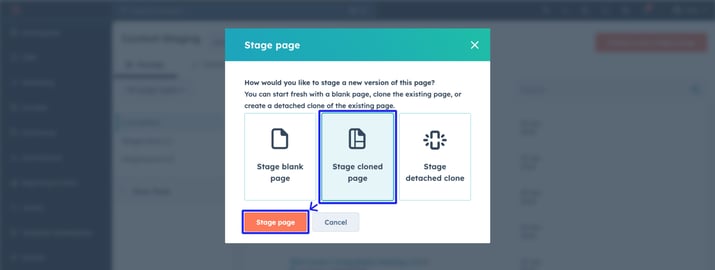
  2. In the stage page dialogue box, choose “Stage Cloned Page” and click “Stage Page”.
    In the stage page dialogue box, choose “Stage Cloned Page” and click “Stage Page”.
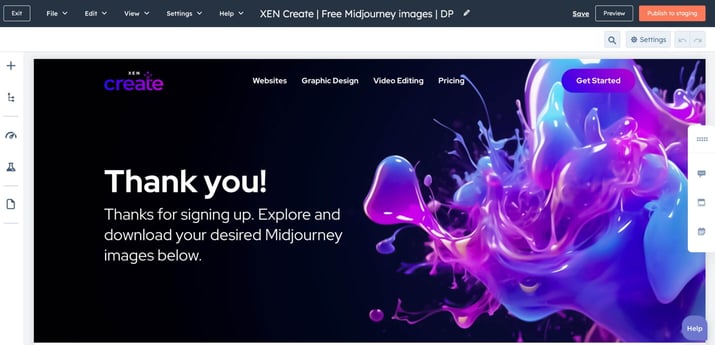
  3. This will open a clone of your live page in the content staging editor, allowing you to edit your content in the page editor.
    This will open a clone of your live page in the content staging editor, allowing you to edit your content in the page editor.

  4. After making your edits, click “Publish to staging.” This action will move your page from the staged draft to staged publish.
    After making your edits, click “Publish to staging.” This action will move your page from the staged draft to staged publish.


IV.  Stage detached clone

Use this if you want to clone or reuse an existing page’s layout for a new staged page. When published, it will not replace the original page you staged—instead, it will go live as a new, separate page.

  1. In the “Unmodified” category, hover over the page you want to copy, then select “Stage” on the right side to clone the layout.
    In the “Unmodified” category, hover over the page you want to copy, then select “Stage” on the right side to clone the layout.

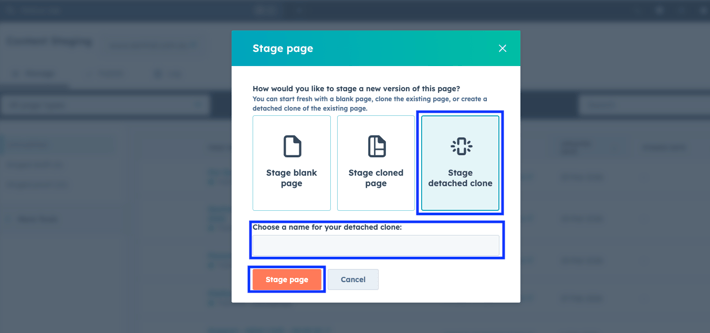
  2. In the Stage Page dialogue box, opt for "Stage detached clone", add your page name, then click “Stage Page”.
    In the Stage Page dialogue box, opt for "Stage detached clone", add your page name, then click “Stage Page”.

  3. This will open a clone of your live page in the content staging editor, allowing you to edit your content in the page editor.
    This will open a clone of your live page in the content staging editor, allowing you to edit your content in the page editor.

  4. After making your edits, click “Publish to staging.” This action will move your page from the staged draft to staged publish.
    After making your edits, click “Publish to staging.” This action will move your page from the staged draft to staged publish.


Things to keep in mind

  • Tip: Use Stage Blank Page, Stage Cloned Page, or Stage Detached Clone if you want to keep the existing page settings, such as the page title, meta description, featured image, URL (except when using Stage Detached Clone), and more.

  • If you make any changes to the child theme, global modules, or HubDB table, it will still impact existing live content. Only the edits you make to the local modules on the page (eg text, sections, images) will not be seen live.


Other actions inside Content Staging

  1. Publish Staged Drafts: Select pages under “Staged Draft” and click the check button above the list to move them all together to “Staged Proof.”
    Publish to staging domain

  2. Revert to Staged Draft: In “Staged Proof,” select pages and use the arrow button above the list to move them back to “Staged Draft.”
    Revert to staged draft


  3. Delete Pages: When you select one or multiple pages in either “Staged Draft” or “Staged Proof,” a delete icon will appear. Use this to delete the selected staged pages. Note that deleting staged pages does not affect your existing live website pages.
    Delete pages from staging domain.


  4. Edit and View Pages: Hover over a page to see the “Edit” and “View” buttons. The “Edit” button allows you to modify your page content, and the “View” button opens a new tab to preview your staged page.
    Edit and view pages


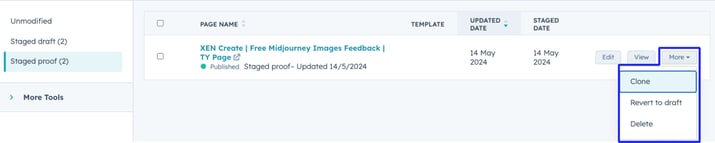
  5. More Options: Click on “More” for additional options such as cloning your staged page, reverting it to draft, publishing it to staged, or deleting it.
    More tools


Publishing your pages in Content Staging to live

Finally, you can now publish your staged pages live. Here's how:

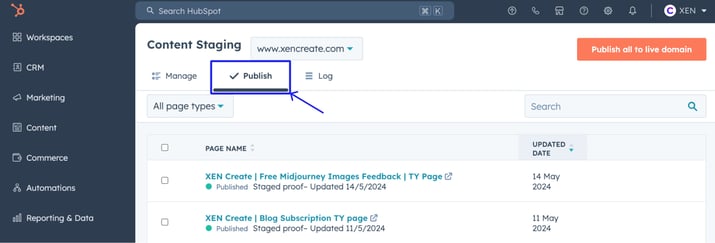
  1. In the Content Staging dashboard, navigate to the "Publish" tab. All pages that are under "Staged Proof" will be visible in this tab.
    In the Content Staging dashboard, navigate to the "Publish" tab. All pages that are under "Staged Proof" will be visible in this tab.

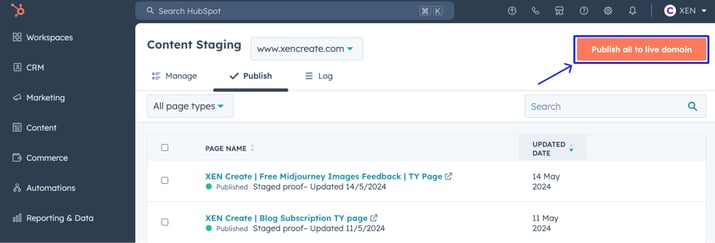
  2. Click "Publish all to live domain" if you want to publish all pages that are in staged proof.

    (We suggest trying to publish a batch of pages first to check and make sure there aren't any issues)

    Click "Publish all to live domain" if you want to publish all pages that are in staged proof.

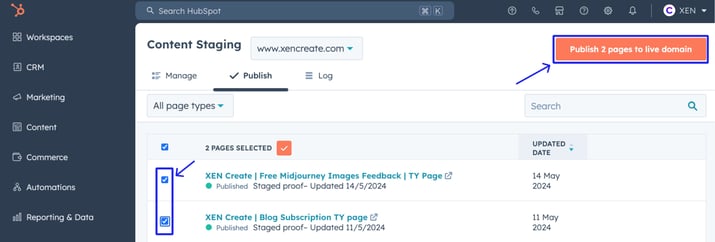
  3. If you want to publish specific pages, tick the checkbox and click "Publish # pages to live domain."
    If you want to publish specific pages, tick the checkbox and click "Publish # pages to live domain."

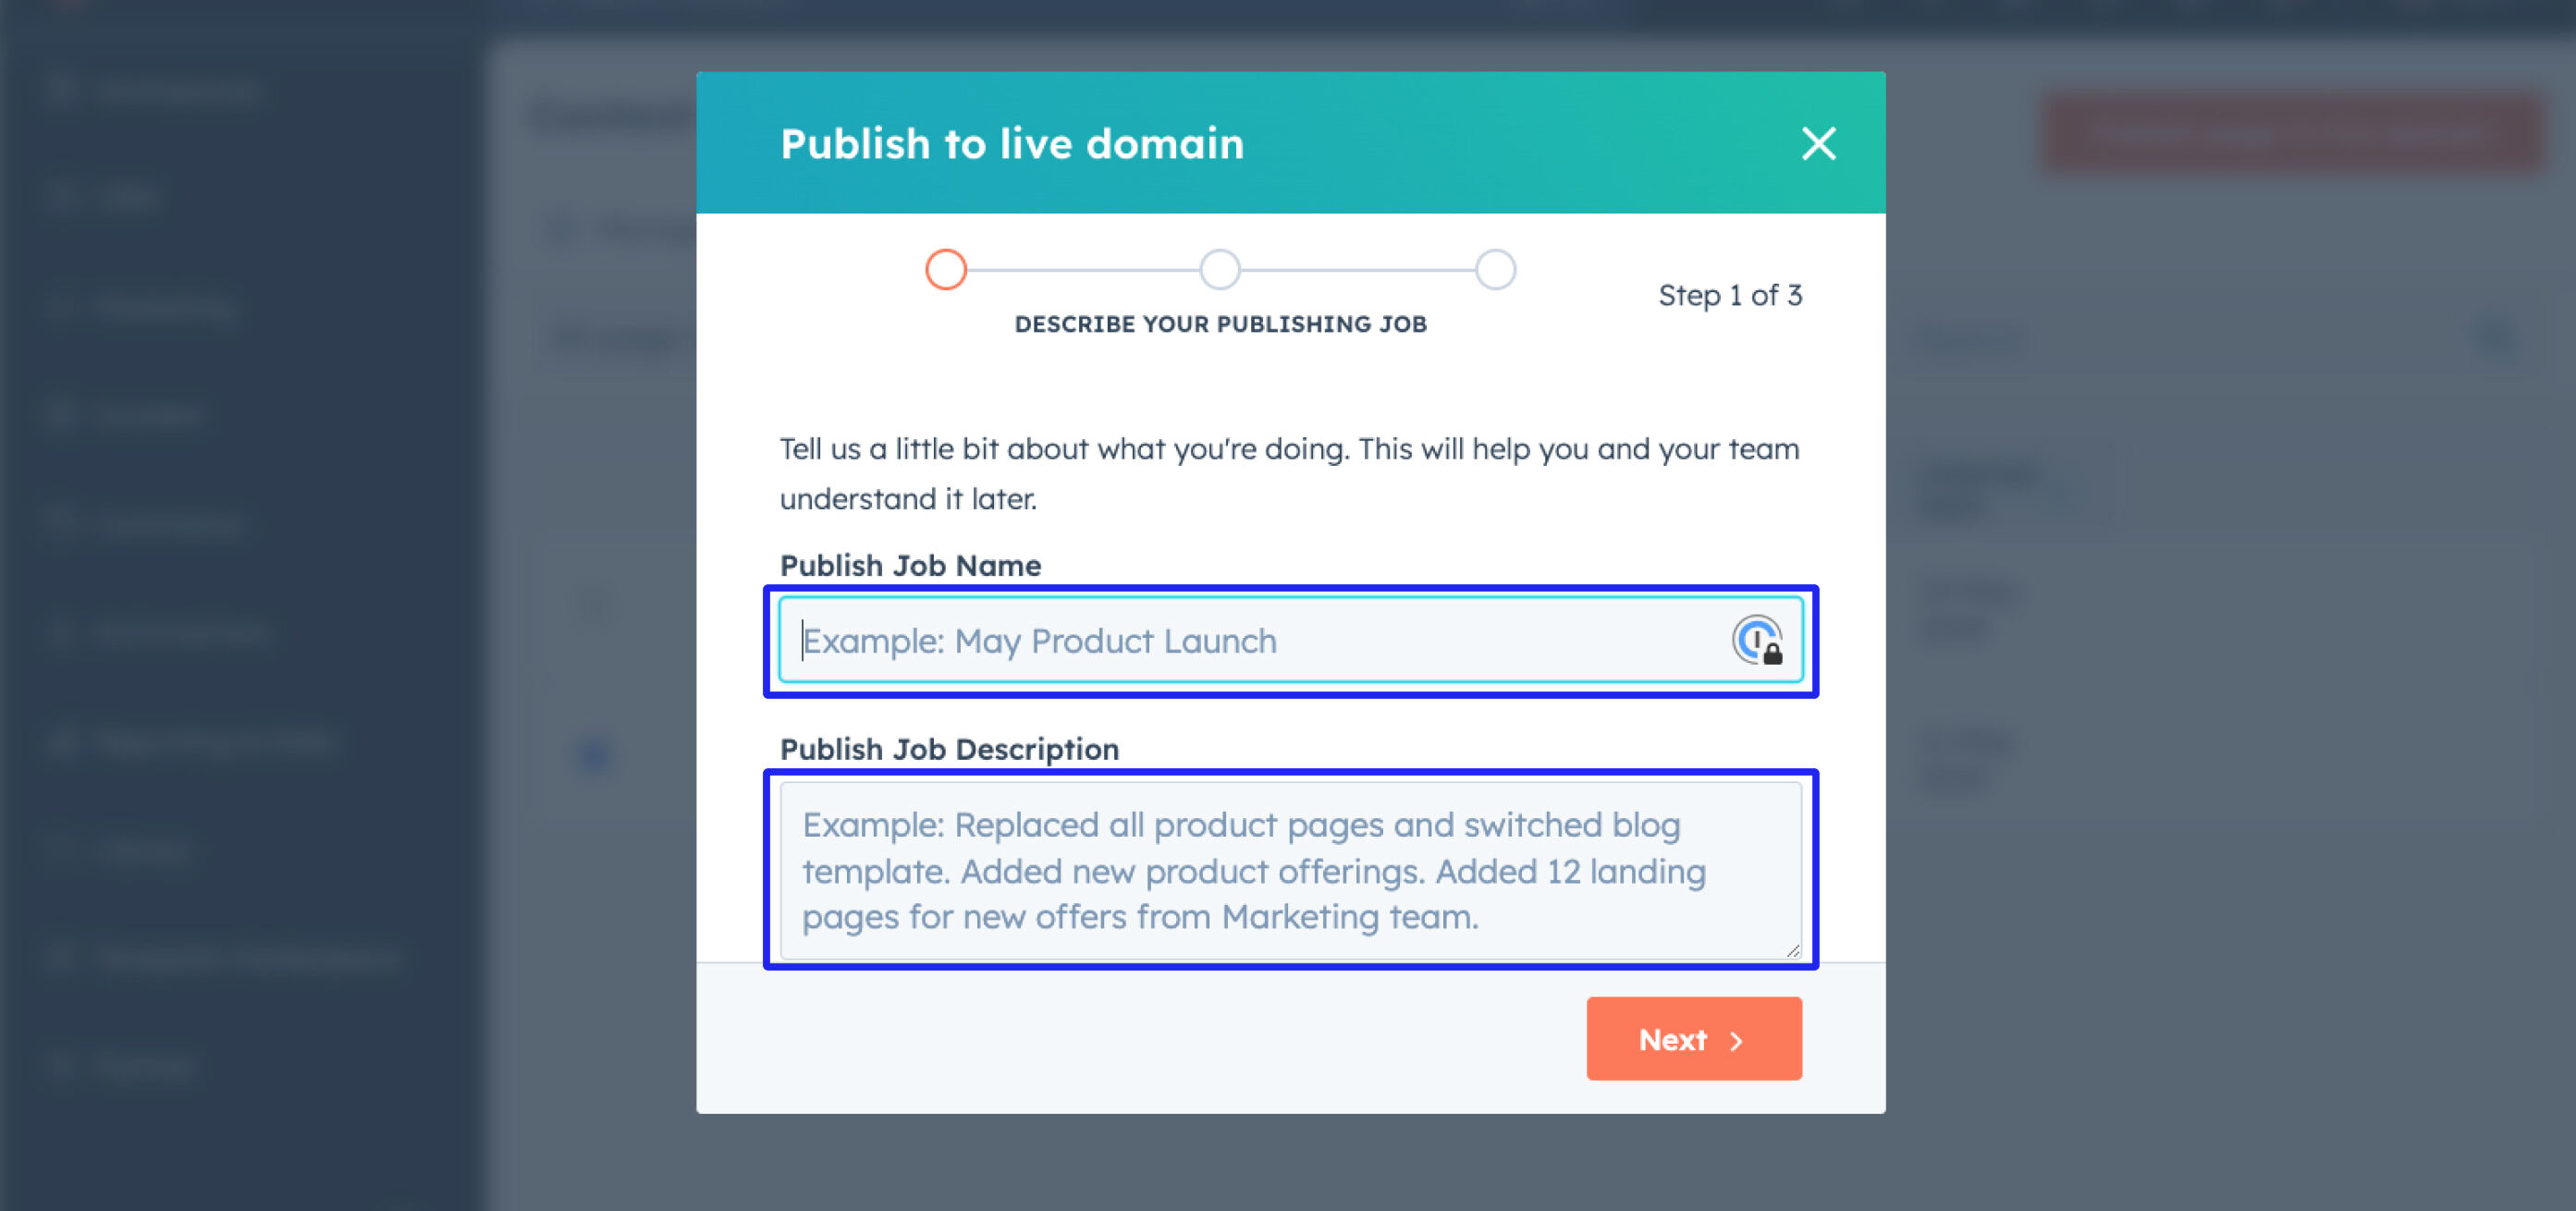
  4. A pop-up will appear. Enter a Publish Job Name and a Publish Job Description, detailing the changes made and the reasons behind them. This information will be displayed in the Log tab of the content staging tool. Then click "Next."
    Enter a Publish Job Name and a Publish Job Description, detailing the changes made and the reasons behind them. Then click "Next"


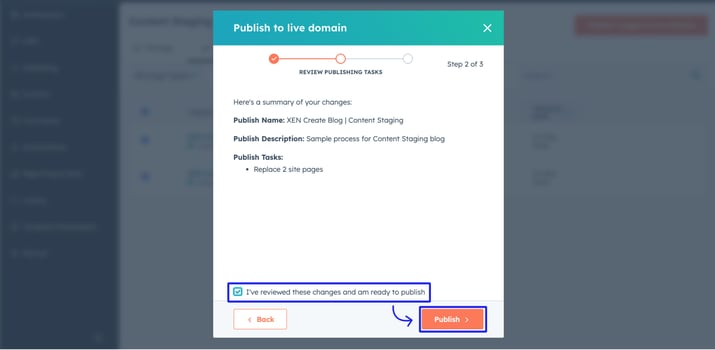
  5. Review the details of your publishing job, then select the checkbox to confirm and click "Publish."
    Review the details of your publishing job, then select the checkbox to confirm and click "Publish."


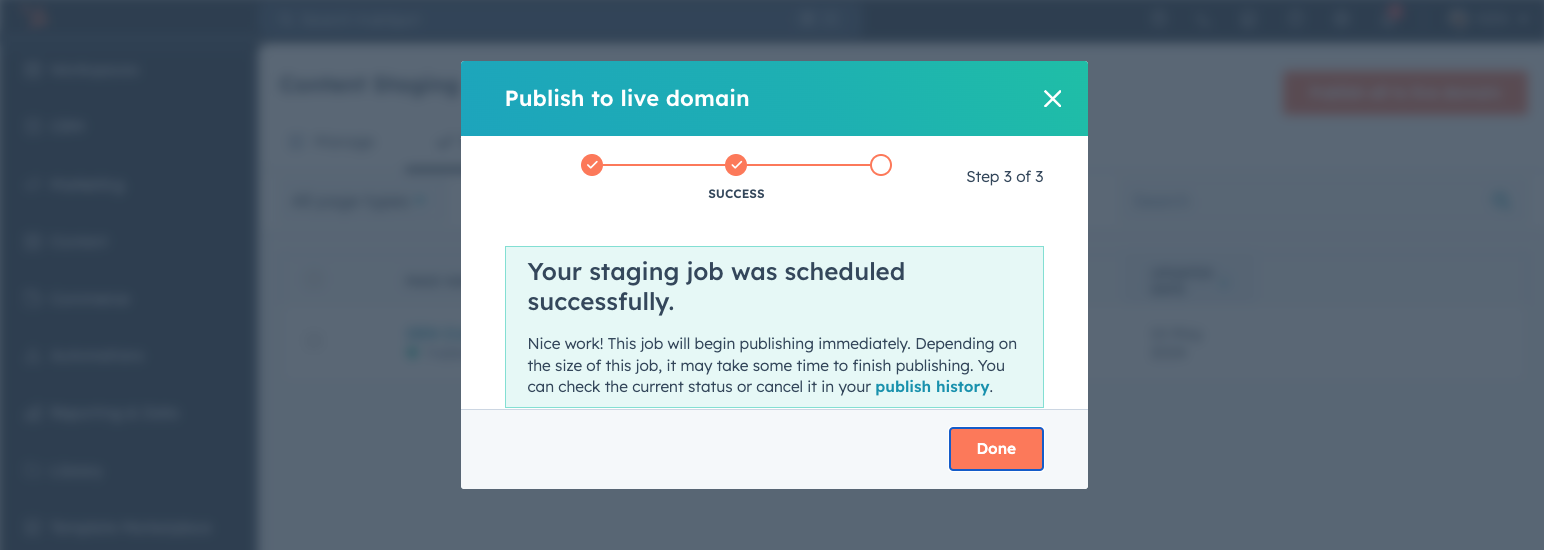
  6. A notification will appear, letting you know your staged pages are now live and visible to everyone. 

    A notification will appear, letting you know your staged pages are now live and visible to everyone.

  7. The live pages can now be accessed in the main Website Pages/Landing Pages dashboard.


Content Staging offers a powerful solution for seamlessly updating and revamping your website. Whether you need to make minor adjustments or undertake a complete overhaul, Content Staging provides the tools and flexibility necessary to execute changes confidently.

By following the steps above you can easily navigate the process of staging, editing, and publishing new content or updates. If you're considering a website revamp, use Content Staging to ensure a smooth and seamless transition.

Explore more ways to utilise your HubSpot portal by diving deeper into HubSpot Content Hub features. Download our HubSpot Content Hub Overview Guide today! 

Learn more about Content Hub and its features

You can also find this guide, along with our other invaluable resources, on our Resources page.


Read more related blogs


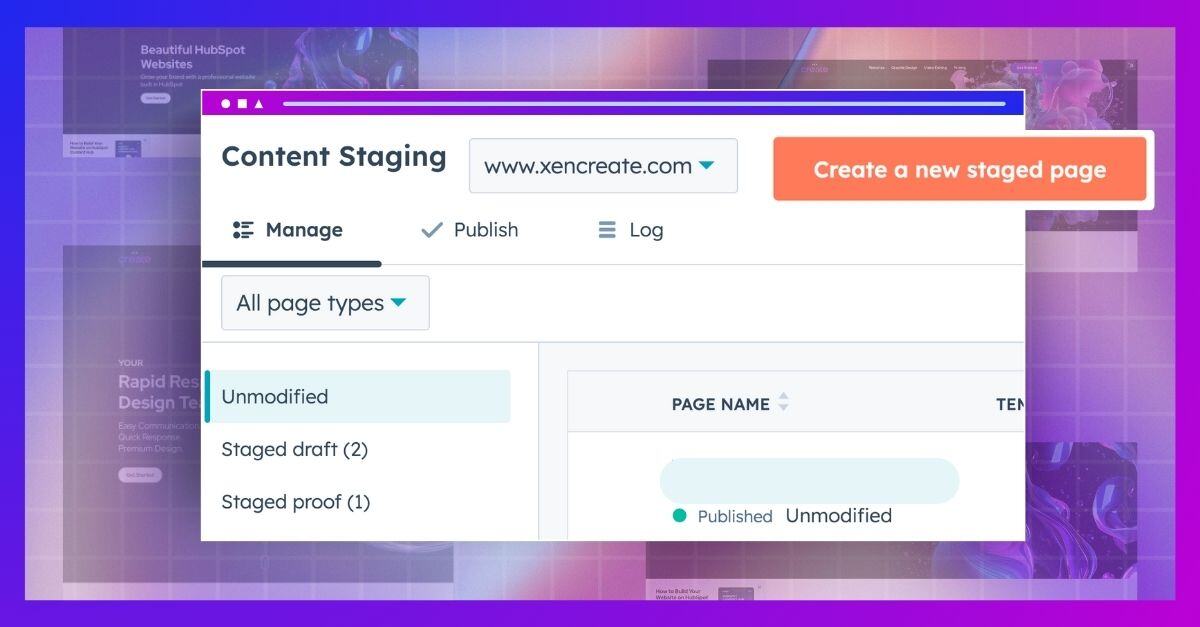
Optimising Website Organisation with HubSpot Content Hub's Site Tree Tool

Optimising Website Organisation with HubSpot Content Hub's Site Tree Tool

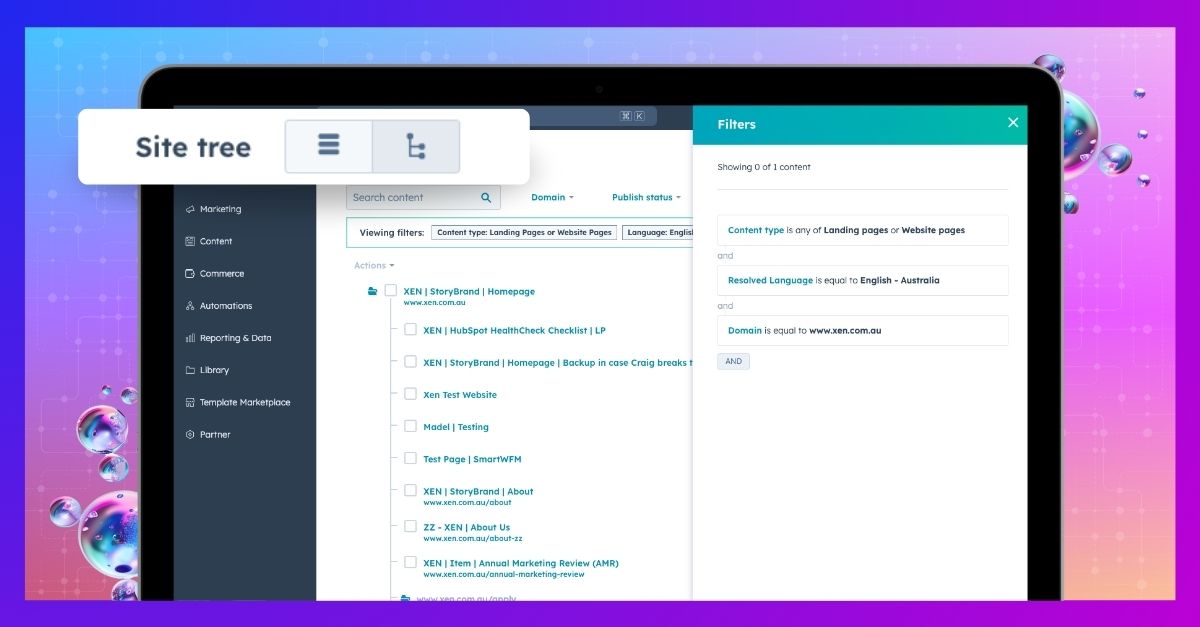
A foundational feature of HubSpot Content Hub is its site tree tool, which provides a straightforward folder visualisation for all your pages....
Read More
HubSpot's Brand Kit Generator: Yay or Nay?

HubSpot's Brand Kit Generator: Yay or Nay?

In our previous blog post, we provided a detailed guide on setting up your brand kit in HubSpot. This ensures consistency across all your brand...
Read More
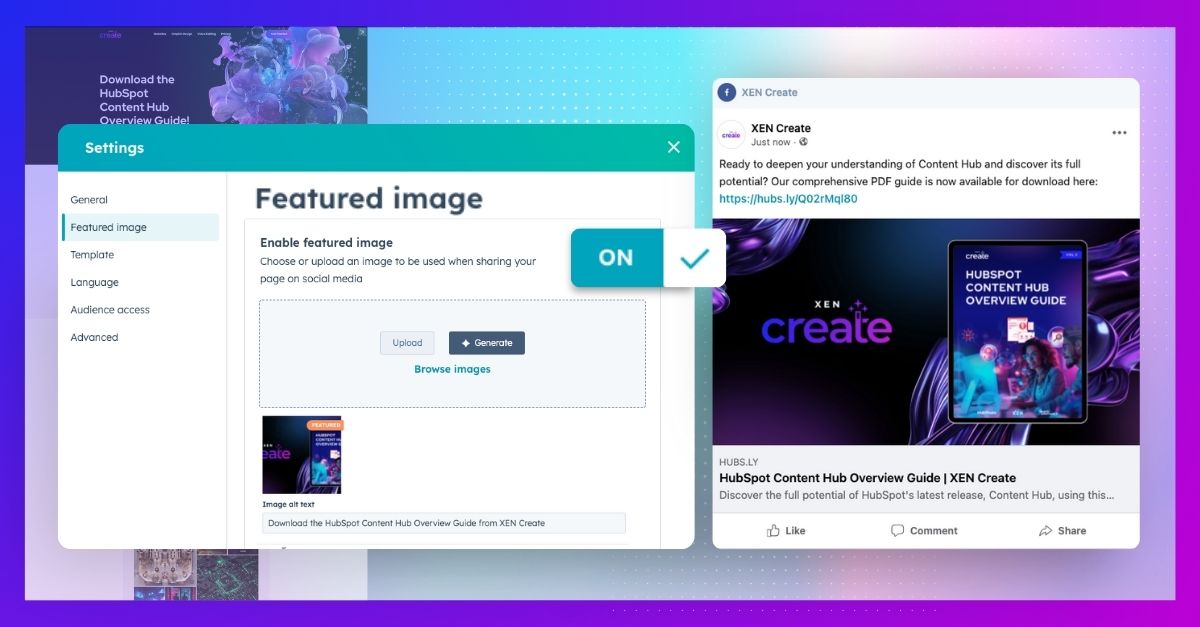
How to set Featured Images in HubSpot Content Hub websites

How to set Featured Images in HubSpot Content Hub websites

Let's start by understanding what a featured image is and why it's important, especially if you're new to website creation. Featured images serve as...

Read More